Introduction
In a previous article we have seen how to create from scratch a web application example with EMF Parsley. Now we’ll go a step further and in particular we will see how to:
- make some little tweaks to make it easier the development
- customize the application
Internal or External browser?
In order to test the application you can use both the internal browser (the one that opens inside Eclipse IDE by default when you launch the application) or any other browser (external) you wish, as far as you point to the same URL. Using RAP you may see often a 404 error when launching: this is due to the fact that the browser does not wait for the embedded server finishing the start and deploy phase. In fact, if you just refresh the page you can have the internal browser work correctly.
So it’s up to you which browser to use: usually it makes no difference.
Fixing the URL port
As you have seen in the previous article, by default the URL port changes every time you stop the application and restart it.
This force you to change the URL in the external browser every time, instead of just refreshing the already opened page.
If you want to keep the port fixed, just click on Run, Run Configurations… (or Debug Configurations… ), select RAP Application / Emf_Parsley_RAP_UI_Example entry, check Use a fixed port option (default is 10080, but you can change it).
Then click on Apply and Close (or Run/Debug, if you want to re-launch it just now).
You just made the first modification to the launch (we’ll need to edit the launch again once in a while)
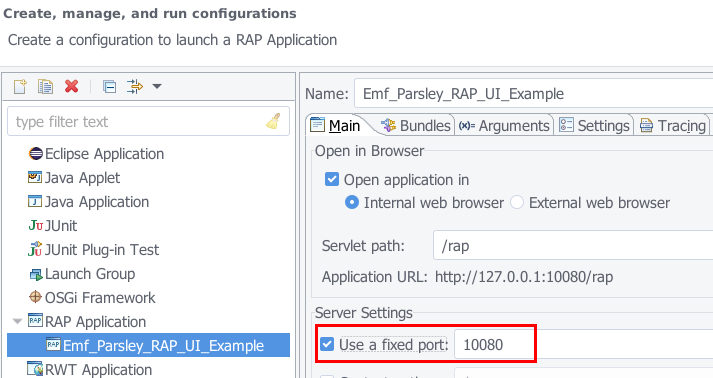
Now you can always use this URL in the external browser:
http://127.0.0.1:10080/rap
An empty Application
The web application example showed in the previous article is most probably far away from any web application you have in your mind now. Instead you may be more interested in starting from scratch, with an empty application that afterward you will fill with custom contents.
At present one of the easiest way to get an empty application consists in getting rid of the views in the example. The previous article showed you how to remove one of the views: you can do the same for the other (SaveableView.java and references in Perspective.java).
Want to change the application title? Change it in ApplicationWorkbenchWindowAdvisor.java (you don’t even have to restart the application; just save the code and refresh the browser!)
Want to change the initial size of the window? Do it 3 code lines above.
Don’t want to see the title bar? Change the last line of this method in
configurer.setShellStyle(SWT.NO_TRIM);
Want to have the application maximized when the browser opens? Add the following method to this same class:
@Override
public void postWindowOpen() {
    getWindowConfigurer().getWindow().getShell().setMaximized(true);
}
(well, for this you need to restart the application)
Want to remove the Exit action from the menu? Then get rid of (comment or remove) the exitAction variable (along with references) in ApplicationActionBarAdvisor.java class.
You can even get rid of the entire Menu just commenting or removing the content of method fillMenuBar(), but let’s wait a little for this: it will be useful in a while.
Since we are cleaning up, let’s remove also ExecutableExtensionFactory.java and GuiceModule.java classes.
Ok, now that the application is this basically empty, we are ready to start thinking about what we want to manage.
Let’s keep it simple: say we want to manage a list of … books? vehicles? customers?
I’ll go for customers, but you use whatever you want.
Modeling with EMF
But where should we design the model of our application? The answer is: in the org.eclipse.emf.parsley.examples.rap.model plug-in.
Expand this plug-in, then do the same for the model folder and open Model.ecore file.
What is this file and what can we do with its associated editor that just opened up?
This file is a way to represent your model using the Eclipse Modeling Framework (EMF) and the editor allows you to design it in a graphical way.
EMF should deserve a whole and extended description; it is by far one of the most important, powerful, versatile and productive-oriented frameworks under the Eclipse community.
However, for the purpose of this tutorial, we will go straight to the point: change the model for our needs and use it right after.
So expand the root node, then the model node (the second-level violet square), then remove all the contained entities (Model, Element, Item) and save.
Now right-click on this second-level model node, select New Child, EClass: we are creating our model entity. Double-click on the new light-yellow node and the Properties view should be focused (usually in the bottom area); find the Name attribute and type “Customer”, then press Enter. Right-click on Customer, select New Child, EAttribute, in Properties view type “businessName” in attribute Name and choose EString in attribute EType
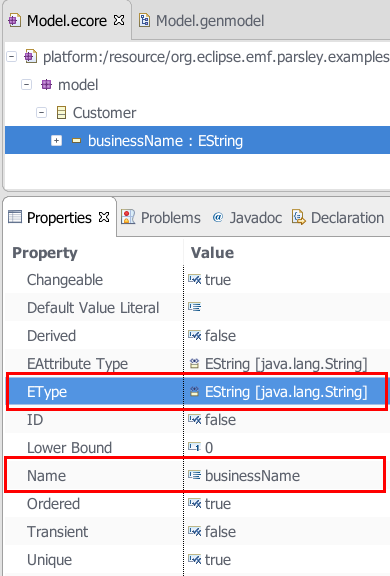
and save. We just defined a new string attribute called “businessName” in the Customer model entity.
Now open the src folder in this plug-in, remove all of its content; open Model.genmodel file (its for code generation), select its root node, right-click and select the first action (Generate Model Code).
In src folder you’ll see the generated Java interfaces and classes needed for handling our model.
Contribute a new plug-in for the Application
Our (empty) Application now needs a new contribution (plug-in) and EMF Parsley provides several wizards for this goal.
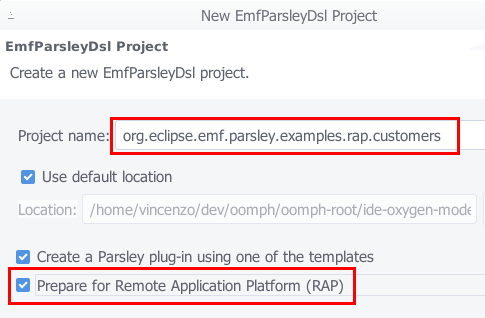
Select File, New, Other…, find and expand the EMF Parsley category and select EMF Parsley Dsl Based Project, press Next.
Then set the plug-in name (e.g. org.eclipse.emf.parsley.examples.rap.customers) and check the Prepare for Remote Application Framework (RAP) option.
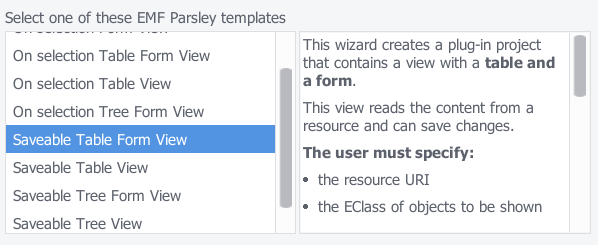
Then Next and on the second page of the wizard choose the Saveable Table Form View template, since we are going to show a table with the list of customers and a detail form for the currently selected customer, then Finish.
Since we want to let this plug-in manage the model, then we need to add a dependency to the model plug-in: so open file plugin.xml in this plug-in (org.eclipse.emf.parsley.examples.rap.customers), go to Dependencies tab and in the Required Plug-ins area press Add… button, select plug-in org.eclipse.emf.parsley.examples.rap.model (you can use the filter above the list and type a substring for filtering), press Ok and save (now our new plug-in has visibility over the model plug-in).
Now we need to specify which model class has to be shown on the table. We can do this editing the Parsley DSL file Customers.parsley which was created by the wizard in this plug-in. This file allows customizing Parsley behaviors in a very easy and compact way (leveraging on another extremely powerful Eclipse framework called Xbase).
So open file Customers.parsley and in section configurator/eClass, specify the model entity that we want to show on the table in view CustomersSaveableTableFormView, using the appropriate (generated) EMF interface:
ModelPackage.Literals.CUSTOMER

We then need to specify how to load/initialize the EMF Resource for the view: so open CustomersSaveableTableFormView class and implement loadResource() method in the most basic way (just returning a new ResourceImpl instance):

In order to show the new Customer view in our application we need to add this line of code to the Perspective class in the application plug-in (org.eclipse.emf.parsley.examples.rap.ui):
layout.addStandaloneView("org.eclipse.emf.parsley.examples.rap.customers",
                           true, IPageLayout.LEFT, .5f, editorArea);
please note that the first parameter is the view ID generated in org.eclipse.emf.parsley.examples.rap.customers/plugin.xml, tab plugin.xml.
Also we need to add the new plug-in (and its potential depencencies to the launch); at the beginning of this article we already saw how to edit the launch (when we fixed the URL port): now reopen the launch and in tab Bundles add the new plugin and its dependencies.
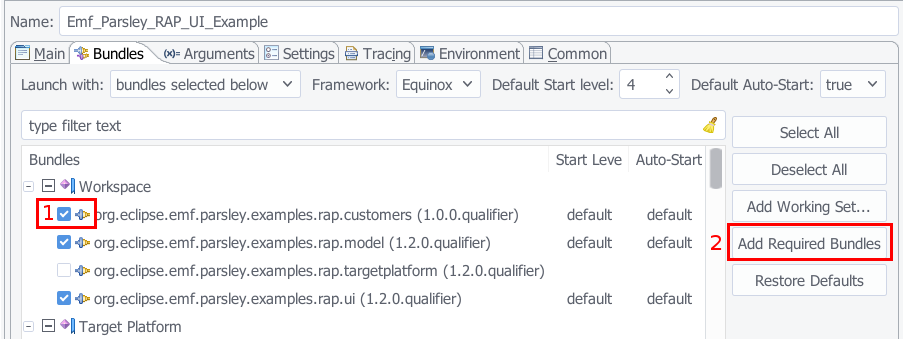
then Apply and Run (or Debug).
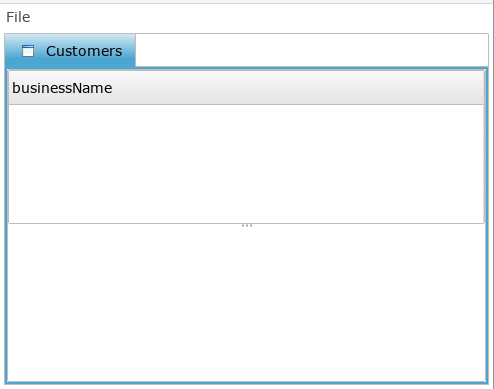
Now refresh browser page and you should see this:
Ok, it’s time to populate the EMF Resource and show some content. In order to do this, again in CustomersSaveableTableFormView class, override createPartControl() method and load some data (in more real scenario the method loadData() will contain business logic to access data from a database or a web service or whatever)
@Override
public void createPartControl(Composite parent) {
    super.createPartControl(parent);
    loadData();
}
private void loadData() {
    Customer c1 = ModelFactory.eINSTANCE.createCustomer();
    c1.setBusinessName("ABC Soft");
    getResource().getContents().add(c1);
    Customer c2 = ModelFactory.eINSTANCE.createCustomer();
    c2.setBusinessName("Smith hardware");
    getResource().getContents().add(c2);
}
If you run the application now
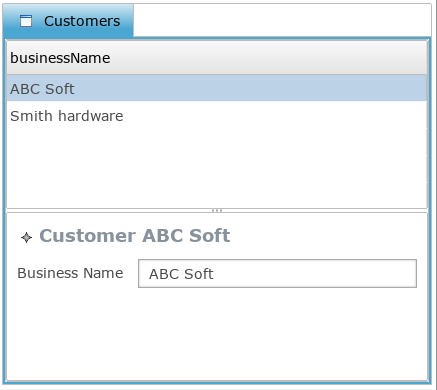
you should see this data, both in the table and on the form, when a row is selected.
We will see next how to customize further in order to add a new customer, add some other attributes to the model and so on.
In general, you should never ever create an EMF resource directly with the constructor: as the EMF book says, you should always create a resource using a resource set and specifying a URI (createResource() can be used for an in-memory resource).
In this very context, where you select a saveable view, creating a resource as you did will surely break most of the behavior of EMF.Edit and as a consequence of Parsley, giving the impression that it is buggy 😉
Since you chose a saveable view, you must provide a URI for the resource to make it effectively saveable and let Parsley do the rest (including creation of an Editing domain and all automatic editing features) and specify the initialization of an empty resource using the DSL. Use a URI pointing to a temporary file (e.g., create a temporary file with Java API and then get the absolute path) or anything else, but you must make the resource saveable. Please let me stress it once again: saveable views must deal with saveable resources. Even if you don’t care about a saveable resource (e.g., you disable the “save” functionality) you should still specify a URI of something that can be loaded/created.