Introduction
With EMF Parsley you can quickly build and easily maintain a web application. Let’s see how. Indeed Parsley allows you to build both desktop and web applications from the same code (single-sourcing), leveraging on Eclipse RCP platform and using RAP for the web, but for the purpose of this article we will focus only on the web side.
Setting up the environment
First of all ensure you have a recent Eclipse IDE installed and running on a brand new workspace.
If you downloaded the Eclipse Modeling Package then you already have EMF Parsley installed, otherwise you can install it from the main Eclipse update site, in the Modeling category. You can find other details on how to install Parsley here.


For web development you’ll need also to install RAP Tools: you’ll find them on the same main Eclipse update site, in the Web, XML, Java EE and OSGi Enterprise Development category


As last step in order to finish the environment setup we need a RAP Target Platform, which will take care of transparently get a web application from SWT (desktop) code used for building the application. Luckily enough Parsley comes with and Example that will allow you to get such a platform quickly.
Therefore go for File, New, Example and choose EMF Parsley RAP Target Platform Example. This will create a project named org.eclipse.emf.parsley.examples.rap.targetplatform; now expand it and open file emf-parsely-rap.target.
You’ll notice that the status bar (bottom-right) shows a message that starts with
Resolving “EMF Parsley …
wait until this message disappears, so when the target is finished and then click on the upper-right hyperlink Set as Active Target Platform. The hyperlink will turn into Reload Target Platform (which you don’t have to click; it just signals that the setting has been executed).
Ok, we are done with initial setup.
First Web application
Now select File, New, Example and choose EMF Parsley RAP Example. This will create two new projects (or better plug-ins, in Eclipse RCP terminology):
- org.eclipse.emf.parsley.examples.rap.model
- org.eclipse.emf.parsley.examples.rap.ui
where the first contains just the Model (data) for the application, whereas the second contains the User Interface (UI) parts that will handle the underlying model.
If you expand the plug-in org.eclipse.emf.parsley.examples.rap.ui you’ll find a file named Emf_Parsley_RAP_UI_Example.launch that you can select, right-click and click on Run As … (or Debug As …) Emf_Parsley_RAP_UI_Example.
At this point the Eclipse internal web browser will start and show an HTTP ERROR 404: just ignore it, copy the URL, open your preferred browser and paste this URL.
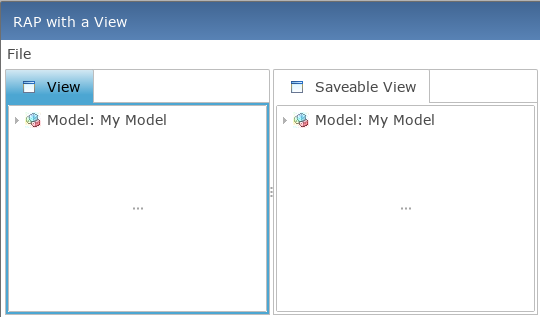
You’ll get something like this:

which is our starting example, containing a Window with a Menu (containing a File menu item) and two views where you can interact with the model (the first view does not allow saving data, while the second does).
In this specific example you will recognize a look and feel that is more typical of a desktop application, but you can customize it (e.g. not showing the external window frame, not showing the Menu or so on).
From now on you can leverage on the highly productive Eclipse Rich Client Platform (RCP) paradigm. Let’s do it!
Let’s say we don’t want the first view and just keep the second:
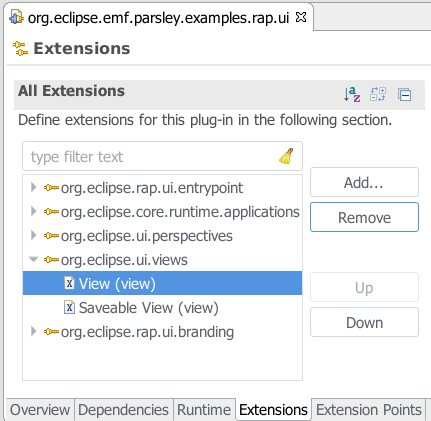
open file org.eclipse.emf.parsley.examples.rap.ui/plugin.xml, go to the Extensions tab, expand node org.eclipse.ui.views and remove this View

Save the change, stop the server (push the red square button in the Console view – in the bottom area usually) and relaunch the application, load it in the browser (please note that the port in URL changes by default, so you need to copy the URL again) and see the result.
To clean up traces of this View (and to avoid errors in Console view – which anyway aren’t blocking) you can also remove the View.java class and remove these lines from Perspective.java:

We will also see how easy is changing the model and rest for our specific needs, but what you can notice is that when you expand the tree, select a node and edit its details all the rest of the UI is automatically in sync (a change of the Name field is reflected both in the detail area and in the tree; the change triggers the “to-be-saved” state – see the asterisk on the view tab; if you do File, Save (or Ctrl-S) this state is reset and so on).
Another powerful thing is that you can put breakpoints and debug the UI code (no, you don’t have to debug Javascript, but pure Java!!).
For now this is just a starting point, we’ll see next how to customize the model, the view and the persistence layer.

Scrivi un commento