Eclipse Modeling Framework (EMF) è, tra i numerosi frameworks dell’ecosistema Eclipse, quello che permette di modellare il cosiddetto Dominio Applicativo della vostra applicazione, ovvero l’insieme delle entità, dei loro attributi e delle loro relazioni. In questo tutorial vedremo come usare EMF per creare il Modello di un’applicazione.
Prima di procedere verificate di possedere una versione di Eclipse con tutto il necessario. Il presente articolo, in particolare, è stato scritto utilizzando la versione Eclipse Juno Modeling .
Il modello Library che useremo come esempio è preso dal Tutorial ufficiale di EMF: esso è costituito dalle entità Author, Book e Library.
Per gli obiettivi di questo tutorial il modello è stato leggermente semplificato in questo modo:
– Author: ha un attibuto String name
– Book: ha un attibuto String title e un attributo author di tipo Author
– Library: ha una collection di oggetti Author e una di oggetti Book
Ok, iniziamo col creare un nuovo (File->New->Other…) Empty EMF Project
![]()
diamogli un nome (es. it.rcpvision.rcptutorial.model) , clicchiamo Finish e otterremo un nuovo progetto pronto per ospitare il nostro modello EMF.
Espandiamo quindi il progetto, selezioniamo la cartella model e all’interno di questa creiamo un diagramma EMF, attraverso tasto destro New->Other->Ecore Tools->Ecore Diagram
premiamo Next, cambiamo (dovremmo leggere “Create Ecore Diagram” come titolo della dialog) il valore del campo Domain File name in “Library.ecore”, e premiamo Finish.
Ci troveremo davanti ad un foglio bianco dove possiamo letteralmente disegnare il nostro modello.
![]() Mentre editiamo questo file .ecorediag, il corrispondente file .ecore verrà automaticamente aggiornato.
Mentre editiamo questo file .ecorediag, il corrispondente file .ecore verrà automaticamente aggiornato.
Notate che il file .ecore è il file principale di EMF e che è anche possibile partire direttamente da esso (invece che dal Diagram) per gestire il modello. In questo tutorial abbiamo deciso di esplorare l’utilizzo degli Ecore Tools ed avere quindi il file .ecore automaticamente generato e sincronizzato in seguito all’editing del diagramma.
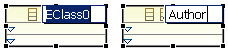
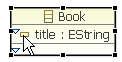
iniziamo quindi selezionando un oggetto EClass dalla Palette (con un click sull’oggetto della palette e poi click sulla pagina bianca dimensionando un’area rettangolare) e rinominiamolo in Author
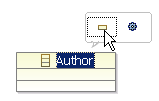
poi muoviamo il cursore sopra il box e selezioniamo l’icona corrispondente all’azione “Add EAttribute“
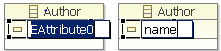
e rinominiamo l’attributo in name
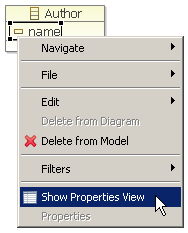
poi eseguiamo tasto destro sull’attributo name e selezioniamo Show Properties View
andiamo alla Properties View, clicchiamo il tasto a destra del campo EType

selezioniamo EString e confermiamo con OK
 in modo da avere la seguente situazione nella Properties View.

Facciamo la stessa cosa per l’entità Book e il suo attributo String title.

Ora, per aggiungere all’entità Book un attributo con riferimento ad Author, clicchiamo sull’icona EReference sulla Palette

poi clicchiamo sull’entità Book
e rilasciamo il mouse sull’entità Author
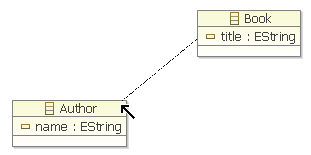
rinominiamo il riferimento come author
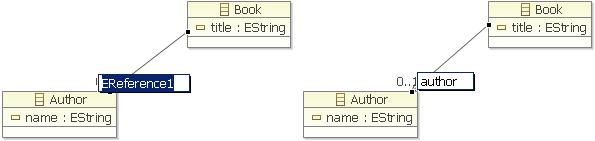
Notate che abbiamo appena creato, sulla classe Book, un attributo di tipo Author chiamato author con cardinalità 0..1 (non obbligatorio).
Se ora salviamo il file .ecorediag e apriamo il file .ecore, vedremo questo

Non abbiamo finito col modello tuttavia. Dobbiamo creare un’entità Library capace di gestire una lista di Author e una di Books. Torniamo quindi sul diagramma e creiamo quindi una EClass di nome Library.
Poi creiamo sulla Library un riferimento verso Author (click su EReference, poi click su Library e trasciniamo il cursore rilasciandolo su Author), chiamando il legame listAuthor. Se ci fermassimo ora avremmo solamente inserito in Library un riferimento, al massimo, ad un singolo Author. Invece il riferimento è multiplo (una Library contiene una collection di oggetti Author), quindi inseriamo “*” (o “-1” nel campo Upper Bound).
In realtà possiamo mettere anche un numero intero per indicare il numero massimo di elementi Author; in ogni caso se tale numero è superiore ad 1, tale attributo verrà gestito come lista, altrimenti come attributo singolo.
Un ultima modifica a tale collection è tuttavia ancora opportuna: va marcata come “Is Containment“

che cosa significa? Significa che il ciclo di vita della collection creata (la lista di Author) è legato al ciclo di vita dell’oggetto Libray, ovvero che l’esistenza di tale lista è subordinata all’esistenza del “contenitore” Library.

Facciamo quindi la stessa cosa con Book

Ora il file .ecore appare così

Potreste preferire gestire il Modello EMF direttamente attraverso l’editing di questo file .ecore (potete trovare un esempio nel tutorial “Eclipse RCP: come creare e persistere un EMF Model“), è semplicemente una questione di preferenze.
La cosa importante è che ora abbiamo un Ecore Model pronto a partire. Si, partire, ma per dove? La risposta è: per generare il sorgente del Modello.
Finora infatti non abbiamo scritto nemmeno una singola linea di codice, ma noi sappiamo che prima o poi ne avremo bisogno.
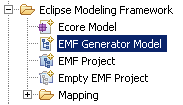
Per questo motivo selezioniamo il file .ecore, tasto destro New->Other…,

selezioniamo EMF Generator Model
clicchiamo Next

clicchiamo Next di nuovo

e di nuovo (selezionando Ecore model)

ora clicchiamo il tasto Load , poi Next

e Finish.
Alla fine abbiamo ottenuto un file Genmodel:
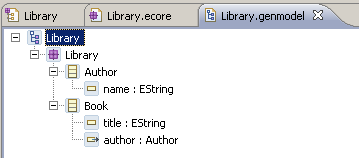
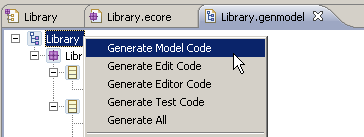
dal quale possiamo generare il sorgente del Modello, semplicemente con tasto destro e selezionando Generate Model Code
ed … ecco il codice del Modello, scritto per voi da EMF!

Prendetevi un po’ di tempo per dare un’occhiata al codice generato e chiedetevi quanto tempo ci sarebbe voluto per creare a mano tale codice (considerate ad esempio che questo codice contempla, fra le altre cose, un meccanismo di notifica associato ad ogni metodo setter, solo per menzionare un aspetto).
Vediamo ora come EMF sia efficace quando si tratta di mantenere un Modello, cioè, quando si rende necessario modificare il Modello stesso.
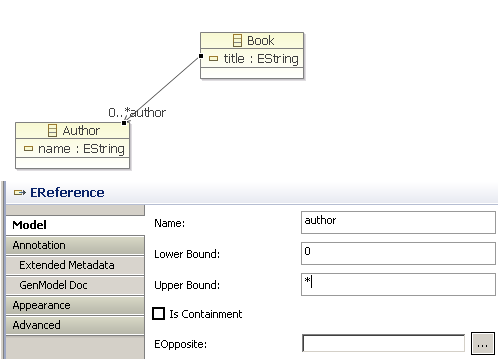
Per far ciò, immaginiamo di renderci conto, all’improvviso, che un’entità Book può avere pi├╣ di un Author! Dunque, abbiamo bisogno di una Collection al posto di un semplice attributo!
Ma abbiamo EMF! Quindi semplicemente faremo questo: selezioniamo il legame autore da Book ad Author e cambiamo il valore di Upper Bound da 1 a * (illimitato)
salviamo, riapriamo il file Genmodel, facciamo di nuovo tasto destro sulla root dell’albero e selezioniamo Generate Model Code
per avere il codice del Modello aggiornato.

Conclusioni
Quali sono dunque i vantaggi dell’introduzione di EMF ?
- il Modello può essere progettato da un non-sviluppatore (magari l’analista, che probabilmente ha una profonda conoscenza del dominio applicativo del Cliente, acquisita magari in decenni di esperienza, ma non conosce quasi per nulla un linguaggio di programmazione, per non parlare di Java)
- il codice del Modello viene generato automaticamente a tempo zero (o meglio: il tempo viene speso nella progettazione del Modello)
- il codice del Modello viene creato e mantenuto in sincronia col progetto del Modello automaticamente, quindi è potenzialmente ridotto a zero il rischio di scrivere codice non corretto.
Complimenti,
spiegazioni semplici ed efficaci.
Hello Vincenzo,
I followed this tutorial to recreate a Library model. It works like a charm a charm – thanks for this detail tutorial. I persisted the model into MySQL database using the HibernateStore. When I looked into the generated schemas (i.e., table colums) inside the MySQL tables, there are so many colums in the table that I conisdered redundant. For example, the Book table contains the following shema:
e_id dtype | e_version | title | library_listbook_e_id | library_listbook_idx | econtainer_class | e_container | e_container_feature_name
The only useful colums are e_id and title. I don’t want the rest of the colums as it makes it difficult to manage the table colums (schemas) intuitively.
Can I use the hibernateProperties.setProperty(PersistenceOptions.PERSISTENCE_XML,
“annotations.xml”); to only generate the only colums (i.e., e_id and title) that are important and related to my model?
If I can use the setProperty, where do I actually place it in my library model project (in the src or model folder), how can I provide the location in the setProperty (is it “/my/emf/example/model/annotations.xml”) and how can I set the namespace-uri in this tag of the annotations.xml file?
Thank you so much!